

Optimizing Images for Next.js Static Websites with AWS Serverless Image Handler
Can I have a static website with optimized images in Next.js?
Well... no :) Next.js does not provide built-in support for image optimization in statically exported web apps. Unlike Gatsby.js, which is able to process and optimize images during the build process, Next.js requires either pre-optimized local images or the use of a remote image optimization service. This limitation means that developers need to handle image optimization manually or rely on external services.
In this article I'll explain why I preferred to use a remote image optimization service for a Next.js static website and how I integrated it with the Serverless Image Handler from AWS Solutions.
TL;DR
Just give me the links!
Struggling with images in Next.js static websites?
Feel free to reach out for consultation!
What happens in other frameworks?
Quick investigation shows that other popular frameworks like Gatsby.js and Svelte have different approaches to image optimization in static websites:
| Framework | Build Time Image Optimization Support | Image Optimization Service |
|---|---|---|
| Gatsby.js | Plugins like gatsby-plugin-image and gatsby-transformer-sharp | Optional |
| Next.js | Custom tooling to generate pre-optimized images. For instance, Next-Image-Export-Optimizer | Required |
| Svelte | third-party plugins or preprocessors | Required |
| Astro | @astrojs/image integration | Optional |
Choosing the right approach
That problem made me to reconsider the convenient Gatsby solution as I had in previous projects. I had to choose between using a remote image optimization service or pre-optimizing images locally during the build process. Both approaches have their pros and cons, depending on factors such as setup complexity, build time, flexibility, performance, storage requirements, cost, maintenance, and other considerations. Here's a comparison of the two approaches:
| Feature/Aspect | Remote Images (Image Optimization API) | Locally Exported Pre-Optimized Images (Build Time) |
|---|---|---|
| Setup Complexity | Requires setting up an external service or API, configuring loaders, and handling API keys and security | Requires configuring build tools to generate multiple image sizes |
| Build Time | Faster, as images are not processed during the build | Slower, as images are processed and optimized during the build |
| Flexibility | High, can dynamically request different sizes and formats based on device and network conditions | Limited to the sizes and formats generated during the build |
| Loading Speed | Potentially better, as images can be optimized on-the-fly based on the user's device and network | Dependent on the pre-generated sizes; may not be as optimized for all scenarios |
| Storage Requirements | Potentially lower, as images are stored and served by the external service | Higher, as multiple sizes of each image need to be stored locally |
| Cost | May incur costs based on usage, API calls, and data transfer | One-time cost during build; also, CDN traffic costs |
| Maintenance | Requires maintaining API integration and handling potential changes in the external service | Requires maintaining build scripts and ensuring all necessary sizes are generated |
| CDN Integration | Can be integrated with CDN for faster delivery | Uses the same CDN as other assets, but requires uploading of all pre-generated images |
| Image Quality | Can dynamically adjust quality based on user conditions | Fixed quality based on build-time settings |
| Fallback Handling | Can provide fallbacks dynamically if the API fails | Fallbacks need to be pre-generated and included during the build |
| Initial Page Load | May be slower initially due to API calls | Faster initial load as images are served directly from the local storage or CDN |
| Caching | Can leverage API and CDN caching strategies | Can leverage CDN caching, but requires proper cache invalidation strategies |
Looking at the comparison, I decided to use a remote image optimization service for my Next.js website. This approach offers more flexibility, faster build times, lower storage requirements, and potentially better image optimization based on user conditions.
Serverless image handler from AWS Solutions
Next problem is to find a suitable image optimization service. I chose the Serverless Image Handler from AWS Solutions, which offers a range of image optimization and modification techniques, including resizing, cropping, and automatic serving of WEBP, PNG, and JPEG formats. The service is based on the Sharp library and can be deployed to a personal AWS account using a CloudFormation template.
| What it offers | What is missing | What I added |
|---|---|---|
| Resizing | Custom domain name | Custom domain name |
| Cropping | Hosting cache and viewer policies control | Hosting cache control |
| Filters | Image metadata information retrieval | |
| Automatic serving of WEBP, PNG, and JPEG formats | Convenient image maintenance | |
| Demo app | ||
| etc. |
To address some of the limitations, I needed to create a CloudFront distribution with caching policies, Cache-Control response headers, and Content Security Policy, and delegate all requests to the original distribution.
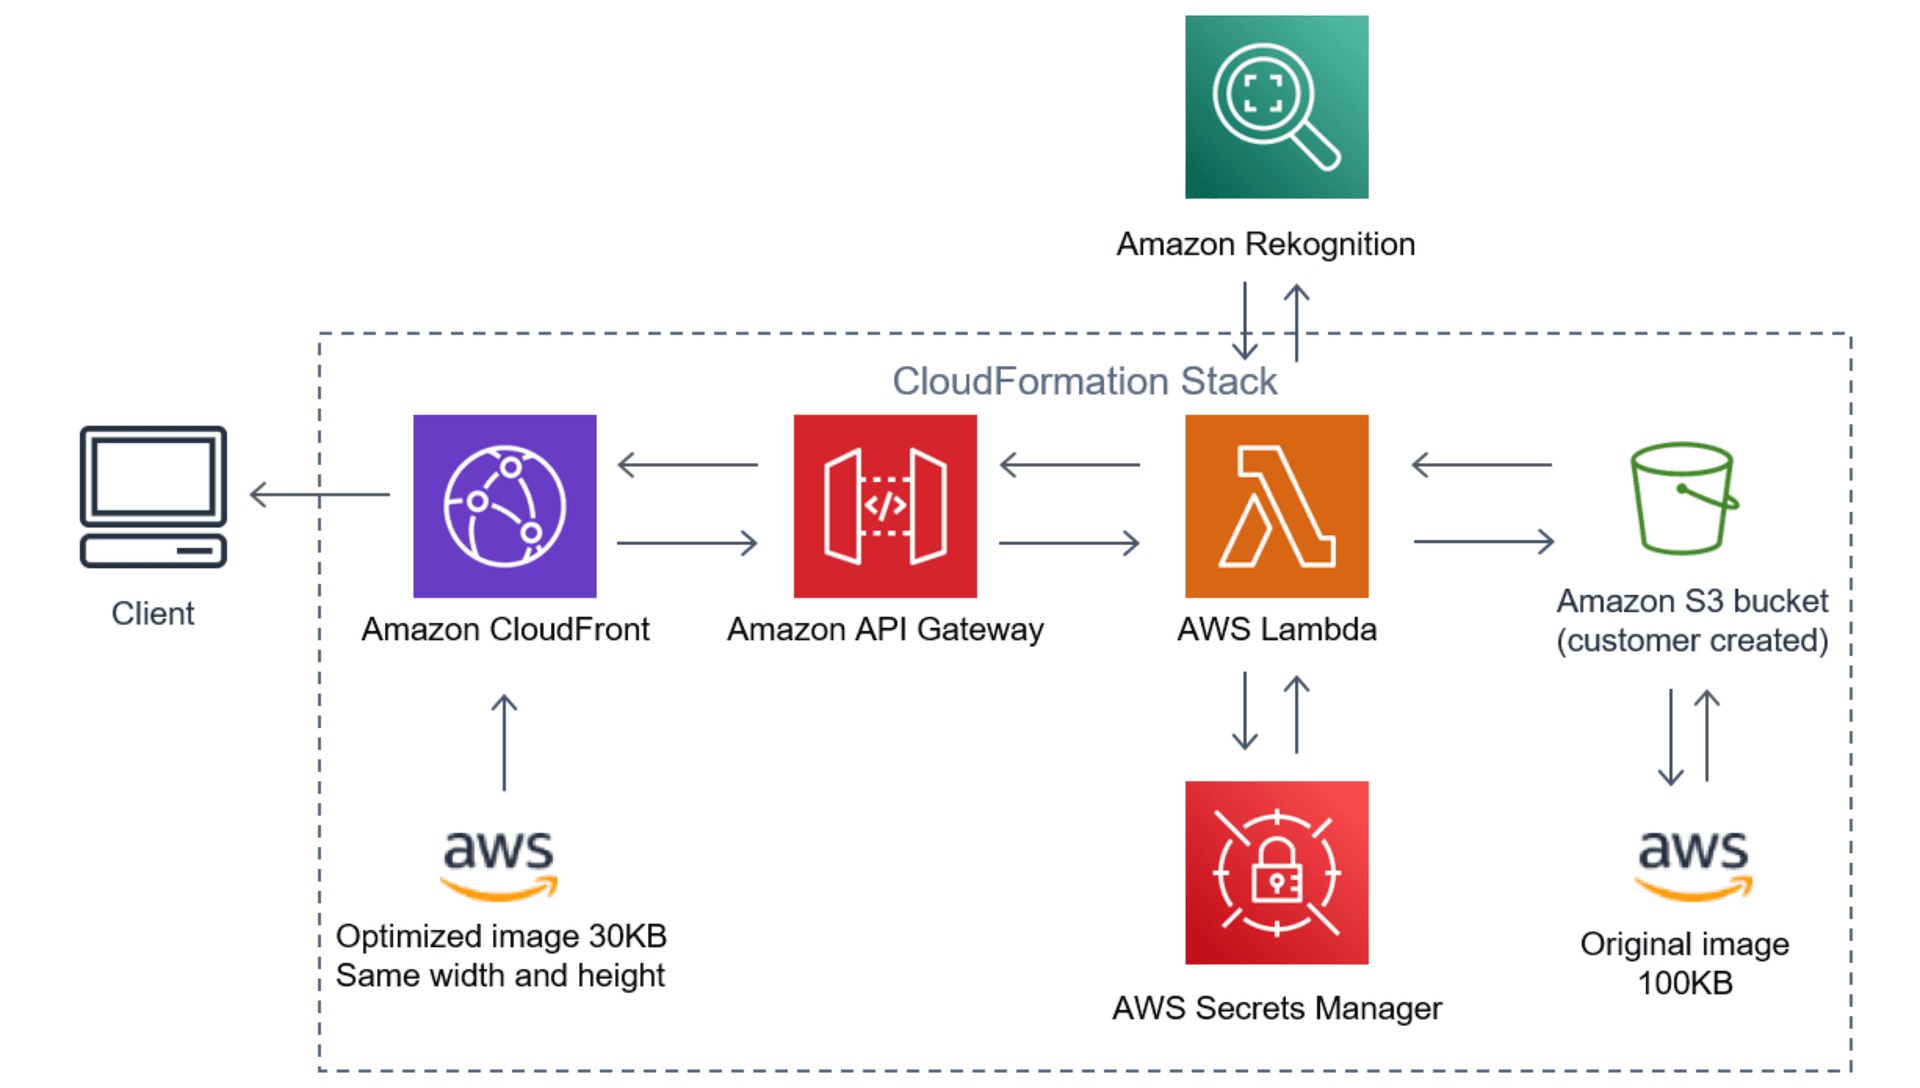
Original architecture of the Serverless Image Handler from AWS Solutions:

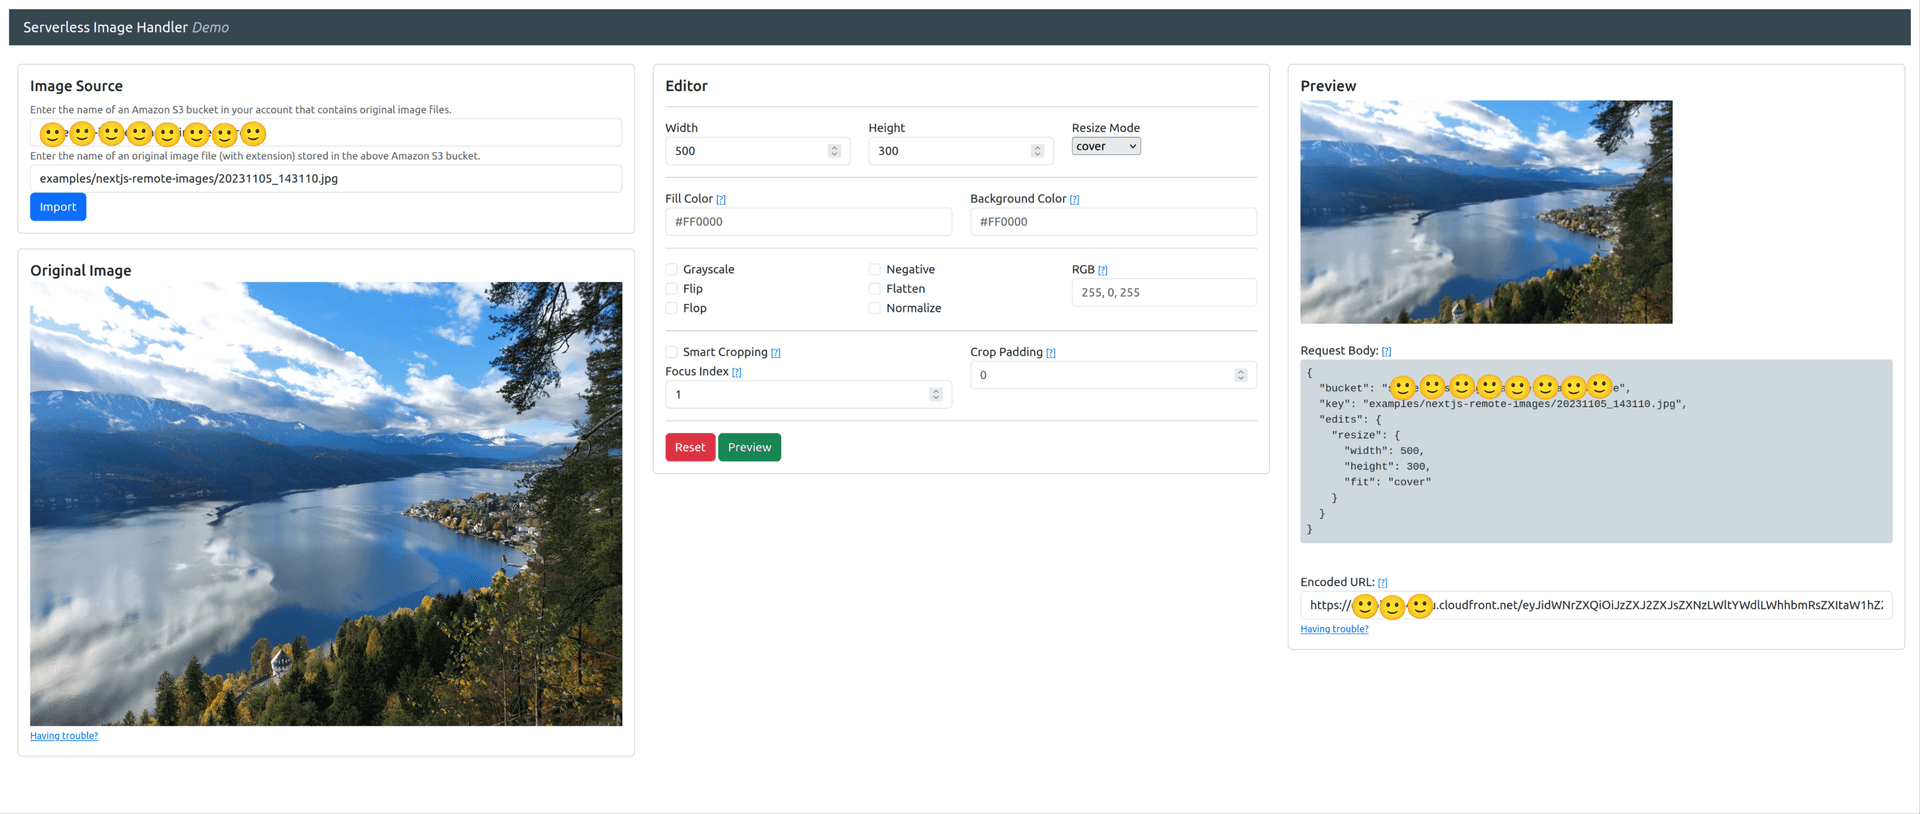
There is also an optional demo app that lets you try out the Serverless Image Handler service with a sample image:

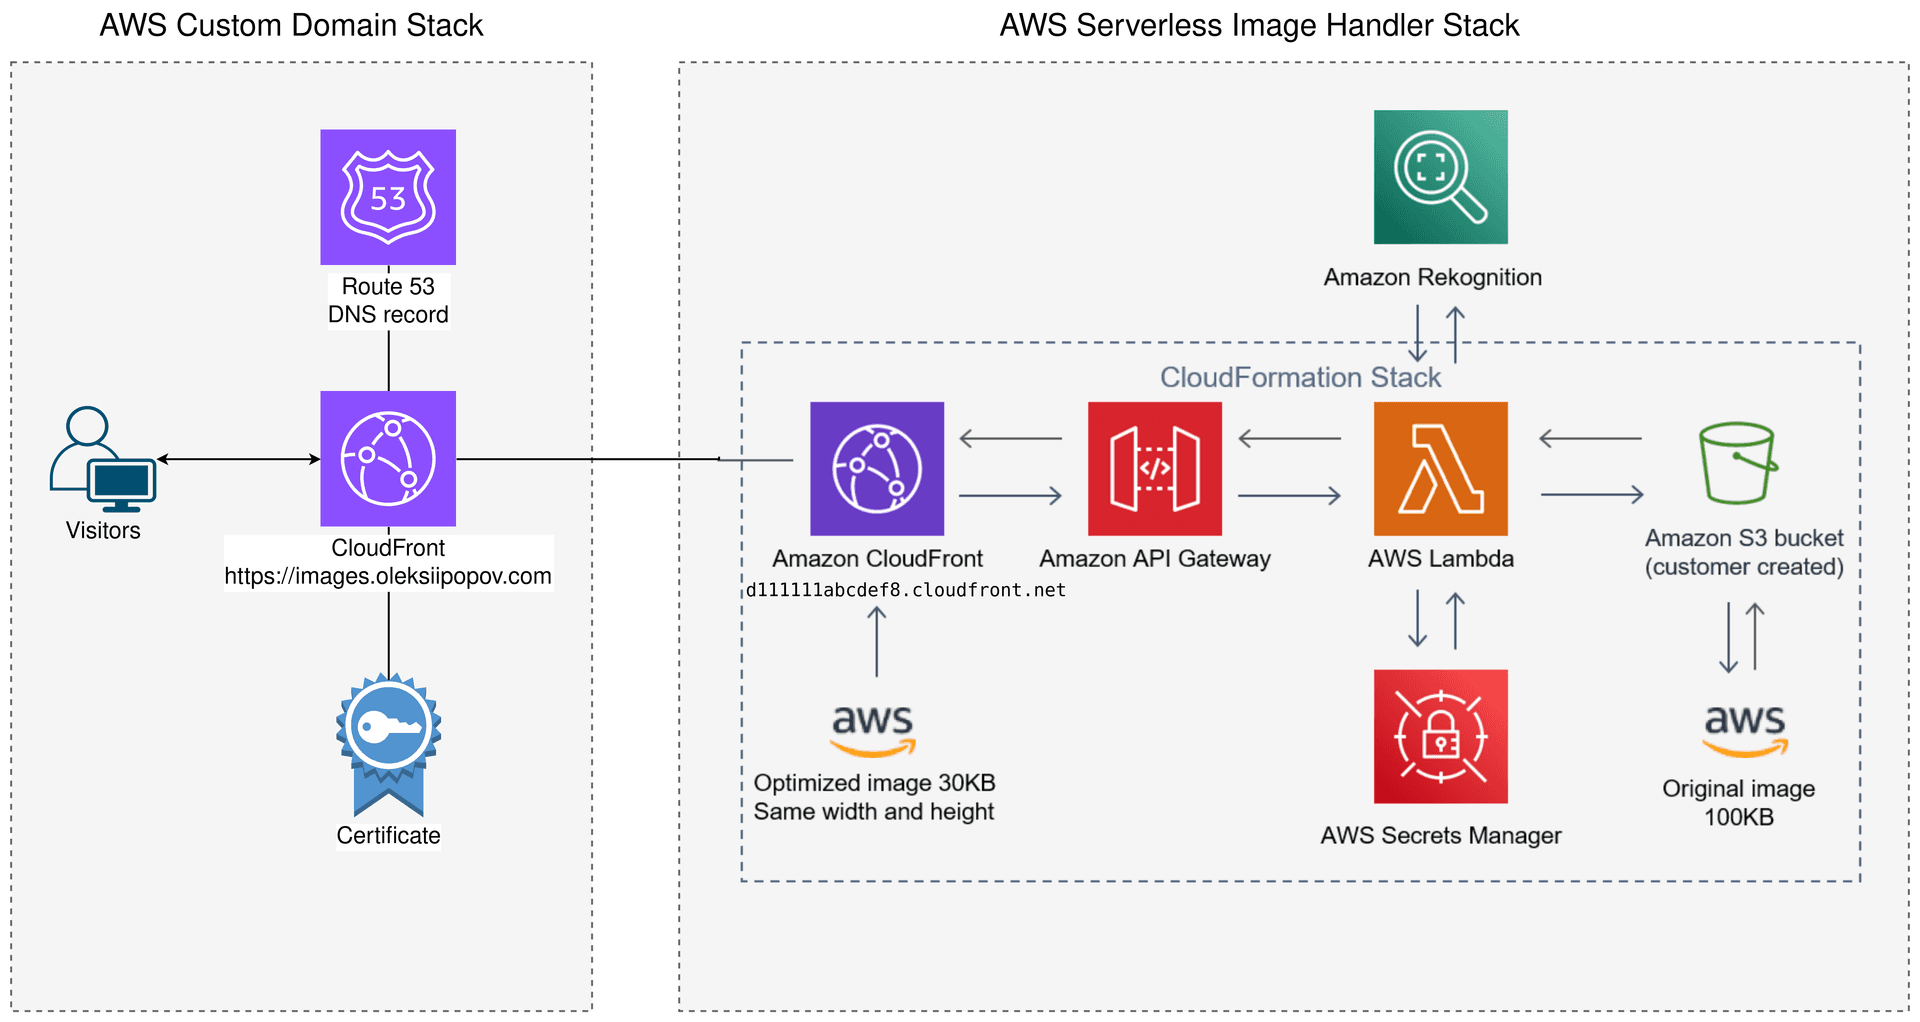
Custom domain name, cache and viewer policies were the most important missing parts for me. For adding those, I've implemented a CloudFront distribution to delegate all requests to the original distribution.
When I added the CloudFront distribution, the architecture looked like this:

Here is the AWS-CDK code snippet for the CloudFront distribution just to give you some implementation details:
export class ImageServiceProxyStack extends Stack {
  constructor(scope: Construct, id: string, props: StackProps) {
    super(scope, id, props);

    const project = configuration.COMMON.project;

    // Hosted zone provides you with a domain name
    const hostedZone = HostedZone.fromHostedZoneAttributes(this, `${project}-hosted-zone`, {
      hostedZoneId: configuration.HOSTING.hostedZoneID,
      zoneName: configuration.HOSTING.hostedZoneName
    });

    // Certifiacte is necessary to use HTTPS
    const certificate = new Certificate(this, `${project}-cert`, {
      domainName: configuration.HOSTING.imageProxyDomainName,
      validation: CertificateValidation.fromDns(hostedZone)
    });

    // Cache policy for the CloudFront distribution to control caching and excoding behavior
    const cachePolicy = new CachePolicy(this, `${project}-cache-policy`, {
      cachePolicyName: `${project}-proxy-cache-policy`,
      headerBehavior: CacheHeaderBehavior.allowList("Accept"),
      cookieBehavior: CacheCookieBehavior.none(),
      enableAcceptEncodingBrotli: true,
      enableAcceptEncodingGzip: true,
      minTtl: Duration.days(30),
      maxTtl: Duration.days(365),
      defaultTtl: Duration.days(100)
    });

    // CloudFront distribution to delegate all requests to the original distribution
    const distribution = new Distribution(this, `${project}-proxy-distribution`, {
      comment: `${project}-main image proxy distribution`,
      httpVersion: HttpVersion.HTTP2_AND_3,
      priceClass: PriceClass.PRICE_CLASS_ALL,
      certificate,
      enableIpv6: true,
      minimumProtocolVersion: SecurityPolicyProtocol.TLS_V1_2_2021,
      enableLogging: true,
      enabled: true,
      domainNames: [
        configuration.HOSTING.imageProxyDomainName
      ],
      defaultBehavior: {
        allowedMethods: AllowedMethods.ALLOW_GET_HEAD_OPTIONS,
        cachePolicy,
        cachedMethods: CachedMethods.CACHE_GET_HEAD_OPTIONS,
        compress: true,
        viewerProtocolPolicy: ViewerProtocolPolicy.REDIRECT_TO_HTTPS,
        origin: new HttpOrigin(configuration.HOSTING.imageProxyOriginDomain, {
          originShieldEnabled: true,
          protocolPolicy: OriginProtocolPolicy.HTTPS_ONLY
        })
      }
    });

    // Record sets to point the domain name to the CloudFront distribution (IPv4)
    new ARecord(this, `${project}-record-a`, {
      recordName: configuration.HOSTING.imageProxyDomainName,
      zone: hostedZone,
      target: RecordTarget.fromAlias(new CloudFrontTarget(distribution))
    });

    // Record sets to point the domain name to the CloudFront distribution (IPv6)
    new AaaaRecord(this, `${project}-record-4a`, {
      recordName: configuration.HOSTING.imageProxyDomainName,
      zone: hostedZone,
      target: RecordTarget.fromAlias(new CloudFrontTarget(distribution))
    });
  }
}
export class ImageServiceProxyStack extends Stack {
constructor(scope: Construct, id: string, props: StackProps) {
super(scope, id, props);
const project = configuration.COMMON.project;
// Hosted zone provides you with a domain name
const hostedZone = HostedZone.fromHostedZoneAttributes(this, `${project}-hosted-zone`, {
hostedZoneId: configuration.HOSTING.hostedZoneID,
zoneName: configuration.HOSTING.hostedZoneName
});
// Certifiacte is necessary to use HTTPS
const certificate = new Certificate(this, `${project}-cert`, {
domainName: configuration.HOSTING.imageProxyDomainName,
validation: CertificateValidation.fromDns(hostedZone)
});
// Cache policy for the CloudFront distribution to control caching and excoding behavior
const cachePolicy = new CachePolicy(this, `${project}-cache-policy`, {
cachePolicyName: `${project}-proxy-cache-policy`,
headerBehavior: CacheHeaderBehavior.allowList("Accept"),
cookieBehavior: CacheCookieBehavior.none(),
enableAcceptEncodingBrotli: true,
enableAcceptEncodingGzip: true,
minTtl: Duration.days(30),
maxTtl: Duration.days(365),
defaultTtl: Duration.days(100)
});
// CloudFront distribution to delegate all requests to the original distribution
const distribution = new Distribution(this, `${project}-proxy-distribution`, {
comment: `${project}-main image proxy distribution`,
httpVersion: HttpVersion.HTTP2_AND_3,
priceClass: PriceClass.PRICE_CLASS_ALL,
certificate,
enableIpv6: true,
minimumProtocolVersion: SecurityPolicyProtocol.TLS_V1_2_2021,
enableLogging: true,
enabled: true,
domainNames: [
configuration.HOSTING.imageProxyDomainName
],
defaultBehavior: {
allowedMethods: AllowedMethods.ALLOW_GET_HEAD_OPTIONS,
cachePolicy,
cachedMethods: CachedMethods.CACHE_GET_HEAD_OPTIONS,
compress: true,
viewerProtocolPolicy: ViewerProtocolPolicy.REDIRECT_TO_HTTPS,
origin: new HttpOrigin(configuration.HOSTING.imageProxyOriginDomain, {
originShieldEnabled: true,
protocolPolicy: OriginProtocolPolicy.HTTPS_ONLY
})
}
});
// Record sets to point the domain name to the CloudFront distribution (IPv4)
new ARecord(this, `${project}-record-a`, {
recordName: configuration.HOSTING.imageProxyDomainName,
zone: hostedZone,
target: RecordTarget.fromAlias(new CloudFrontTarget(distribution))
});
// Record sets to point the domain name to the CloudFront distribution (IPv6)
new AaaaRecord(this, `${project}-record-4a`, {
recordName: configuration.HOSTING.imageProxyDomainName,
zone: hostedZone,
target: RecordTarget.fromAlias(new CloudFrontTarget(distribution))
});
}
}How to use the Serverless Image Handler in Next.js?
What is statically exported Next.js app?
Static website is a typically multipage website that is rendered on build time and served as a set of static HTML, CSS, and JavaScript files. It is a good choice for websites that do not require dynamic content and can be pre-rendered on build time. Next.js provides a way to export a static website. It generates a set of static HTML files that can be served from any static hosting provider like AWS CloudFront.
For setting this up, you need to use the output: 'export' option of next.config.ts configuration file. See the details here. This mode has restrictions, one of which is unsupported image optimization.
Image loader
So, in our case, remote images should be loaded with a custom "loader", which "knows" how to get a correct URL of an image, based on its size, quality and path.
Here is the example of a custom loader for the Next.js next/image component:
'use client';

import {ImageLoaderProps} from "next/image";
import {getImageURL} from "@/lib/image";

export function imageLoader({src, width, quality}: ImageLoaderProps) {
  return getImageURL({src, width, quality});
}
'use client';
import {ImageLoaderProps} from "next/image";
import {getImageURL} from "@/lib/image";
export function imageLoader({src, width, quality}: ImageLoaderProps) {
return getImageURL({src, width, quality});
}imageLoader does not use height property, as it is not supposed to be known upfront. This may cause a problem with the layout shift, but there is a way to mitigate it by using a blur placeholder. We will talk about it later.
The getImageURL function is a helper function that generates a URL for the Serverless Image Handler service based on the image path, width, and quality.
The service provides a URL-based API to request images with specific transformations. For example, to request an image, you use the following URL - https://<your-domain>/<base64-cfg>, where <your-domain> is the domain of the Serverless Image Handler service, and <base64-cfg> is a base64-encoded JSON object containing the image transformation parameters. For example:
{
  "bucket": "YOUR BUCKET NAME",
  "key": "path/to/my-image.jpg",
  "edits": {
    "webp": {
      "quality": 75
    },
    "png": {
      "quality": 75
    },
    "resize": {
      "width": 300,
      "height": 200,
      "fit": "contain"
    }
  }
}
{
"bucket": "YOUR BUCKET NAME",
"key": "path/to/my-image.jpg",
"edits": {
"webp": {
"quality": 75
},
"png": {
"quality": 75
},
"resize": {
"width": 300,
"height": 200,
"fit": "contain"
}
}
}So, in the end getImageURL looks like this:
type Props = {
    src: string;
    width: number;
    height?: number;
    quality?: number;
    position?: string;
};

function getImageURL(props: Props) {
  const {src, width, height, quality = 75, position = 'centre'} = props;

  const taskToEncode = {
    bucket: "YOUR BUCKET NAME",
    key: `${BASE_PATH}${src}`,
    edits: {
      webp: {
        quality
      },
      png: {
        quality
      },
      jpg: {
        quality
      },
      resize: {
        width,
        height,
        // See https://sharp.pixelplumbing.com/api-resize
        fit: 'contain',
        position,
      },
    },
  };

  return `${BASE_URL}/${btoa(JSON.stringify(taskToEncode))}`;
}
type Props = {
src: string;
width: number;
height?: number;
quality?: number;
position?: string;
};
function getImageURL(props: Props) {
const {src, width, height, quality = 75, position = 'centre'} = props;
const taskToEncode = {
bucket: "YOUR BUCKET NAME",
key: `${BASE_PATH}${src}`,
edits: {
webp: {
quality
},
png: {
quality
},
jpg: {
quality
},
resize: {
width,
height,
// See https://sharp.pixelplumbing.com/api-resize
fit: 'contain',
position,
},
},
};
return `${BASE_URL}/${btoa(JSON.stringify(taskToEncode))}`;
}Check out the https://sharp.pixelplumbing.com/api-resize documentation for the full list of available options.
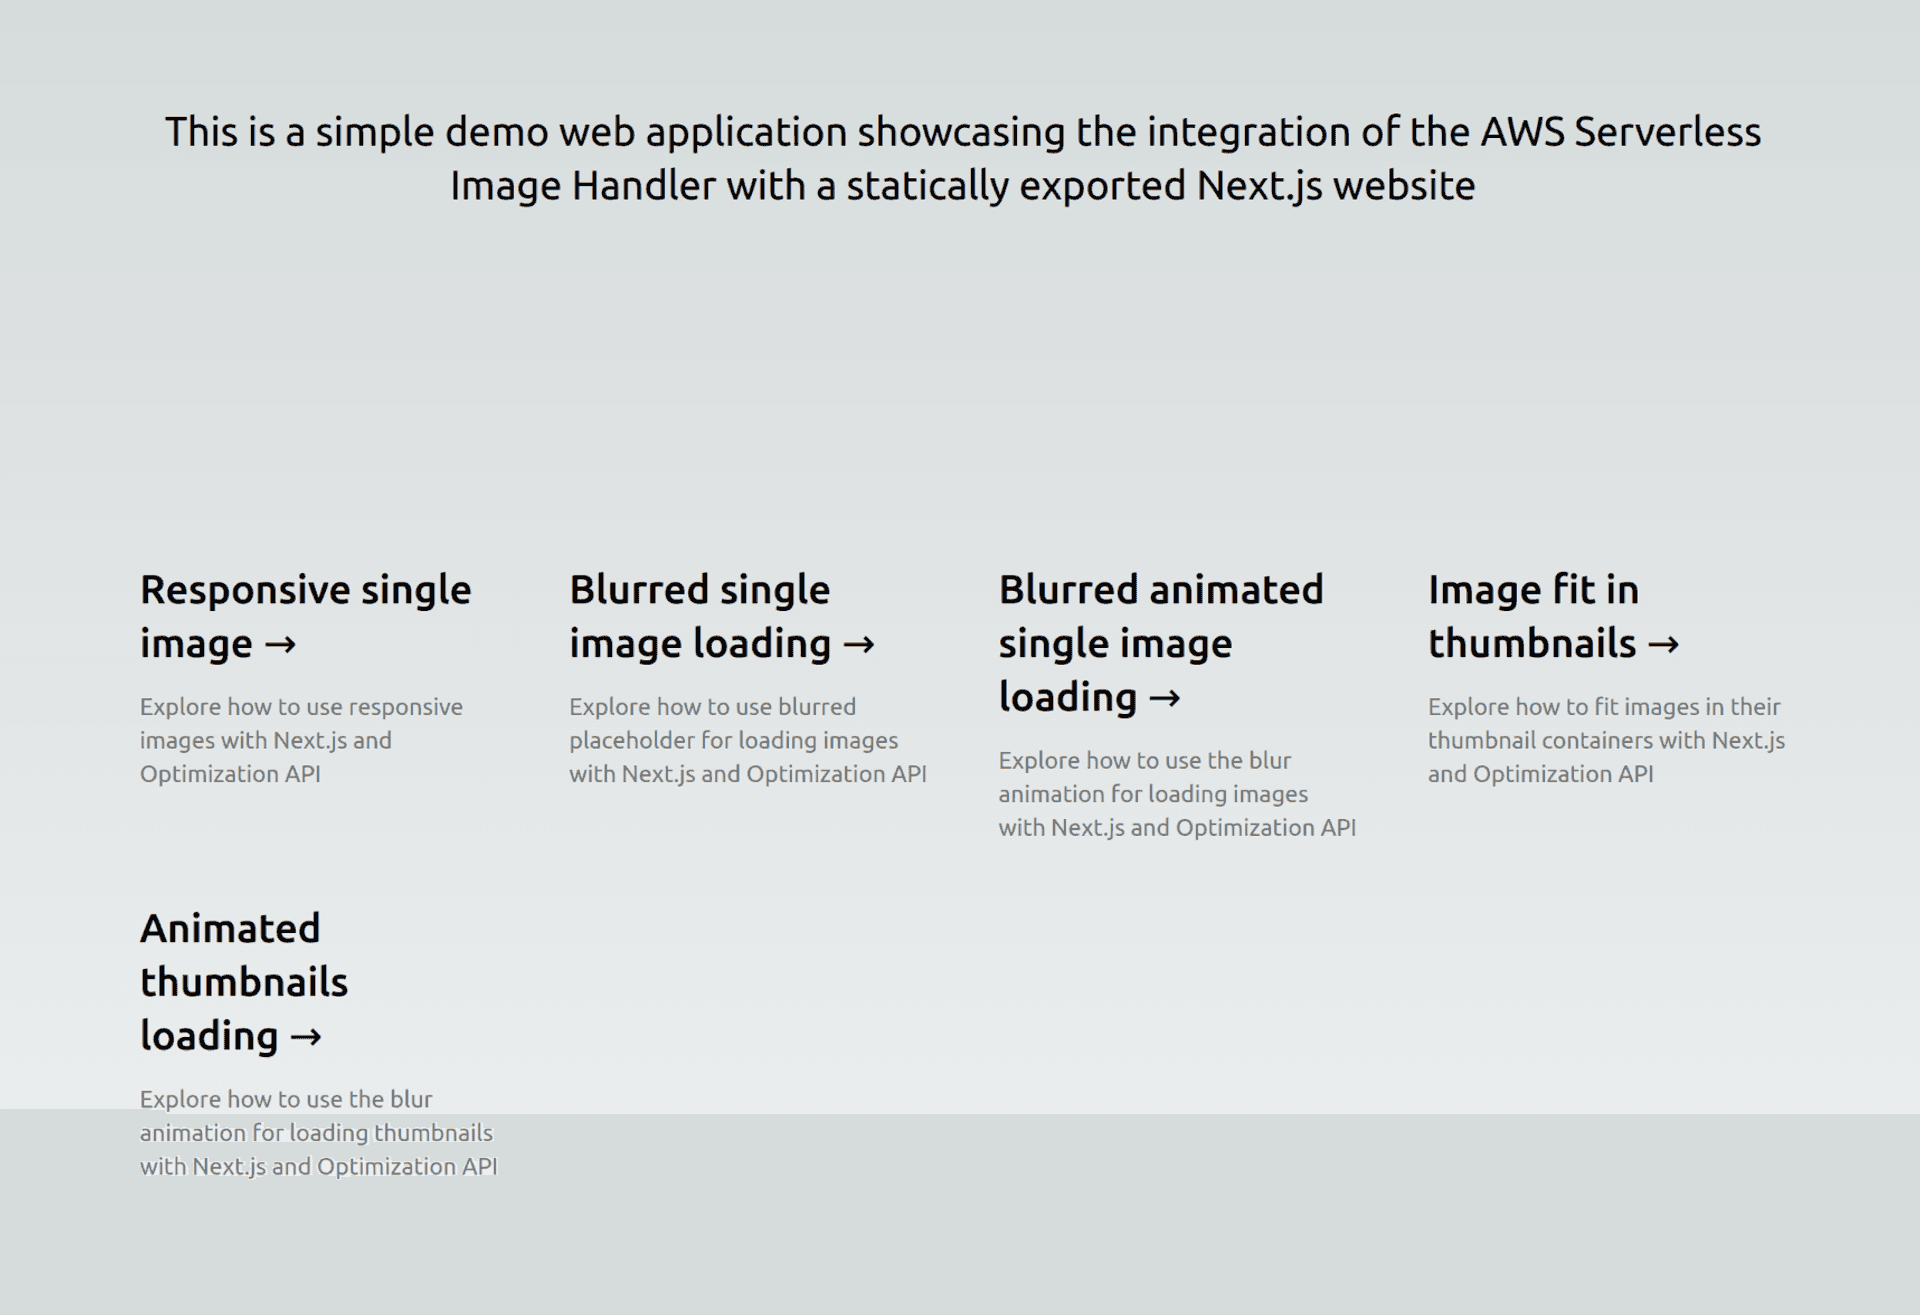
The Demo Application
In order to show the different use cases of images in a static Next.js app and AWS Serverless Image Handler, I built this demo app. It contains multiple examples of image optimization and loading techniques, including:
- Single responsive image (simple next/image component)
- Single responsive image with a blur placeholder (next/image component with blurDataURL and placeholder="blur" attributes)
- Single responsive image with blur transition (animation on image load)
- Thumbnails with different "image fit" modes (next/image component with different
resize.fitAPI configurations) - Full Thumbnails with loading animation
- Cropped Thumbnails with loading animation

Next, we will go through each example in detail and see how the images are loaded, optimized, cropped and positioned in placeholders. So the AWS Image Handler service is proven to be a good solution for Next.js static websites.
Single responsive image
It is the simplest use case of next/image component. It loads an image with a specific size and quality. The image is resized based on the device's screen size and resolution.
If you click on the video below, you will see how the loading of different image sizes happens while resizing the screen (normal network):
If you check the visual loading process in a non-ideal connectivity, it will look a bit glitchy (3G network emulation):
Image renders partially, which is not a good user experience. To improve it a bit, we can use a blur placeholder.
Single responsive image with blur placeholder
Check the video below to see how the image loads with a blur placeholder:
Situation is already better. The image is not fully loaded yet, but the user can see the placeholder, which is pre-rendered into the HTML page. So the placeholder of a correct size already occupies its place. This minimizes the layout shift and improves the user experience. Still not optimal. We still can see, how the image is loading.
Single responsive image with blur transition
Check the video below to see how the image loads with a blur transition (animation):
The image is loading with a smooth transition from the blurred placeholder to the full image. This is a good user experience. The user can see the image loading process, but it is not annoying. The final image is revealed only when it is fully loaded.
Thumbnails with different "image fit" modes
Next, we have thumbnails with different "image fit" modes. The images are resized and cropped based on the specified fit mode. The fit modes include "fill", "inside", "outside", "cover", "contain".

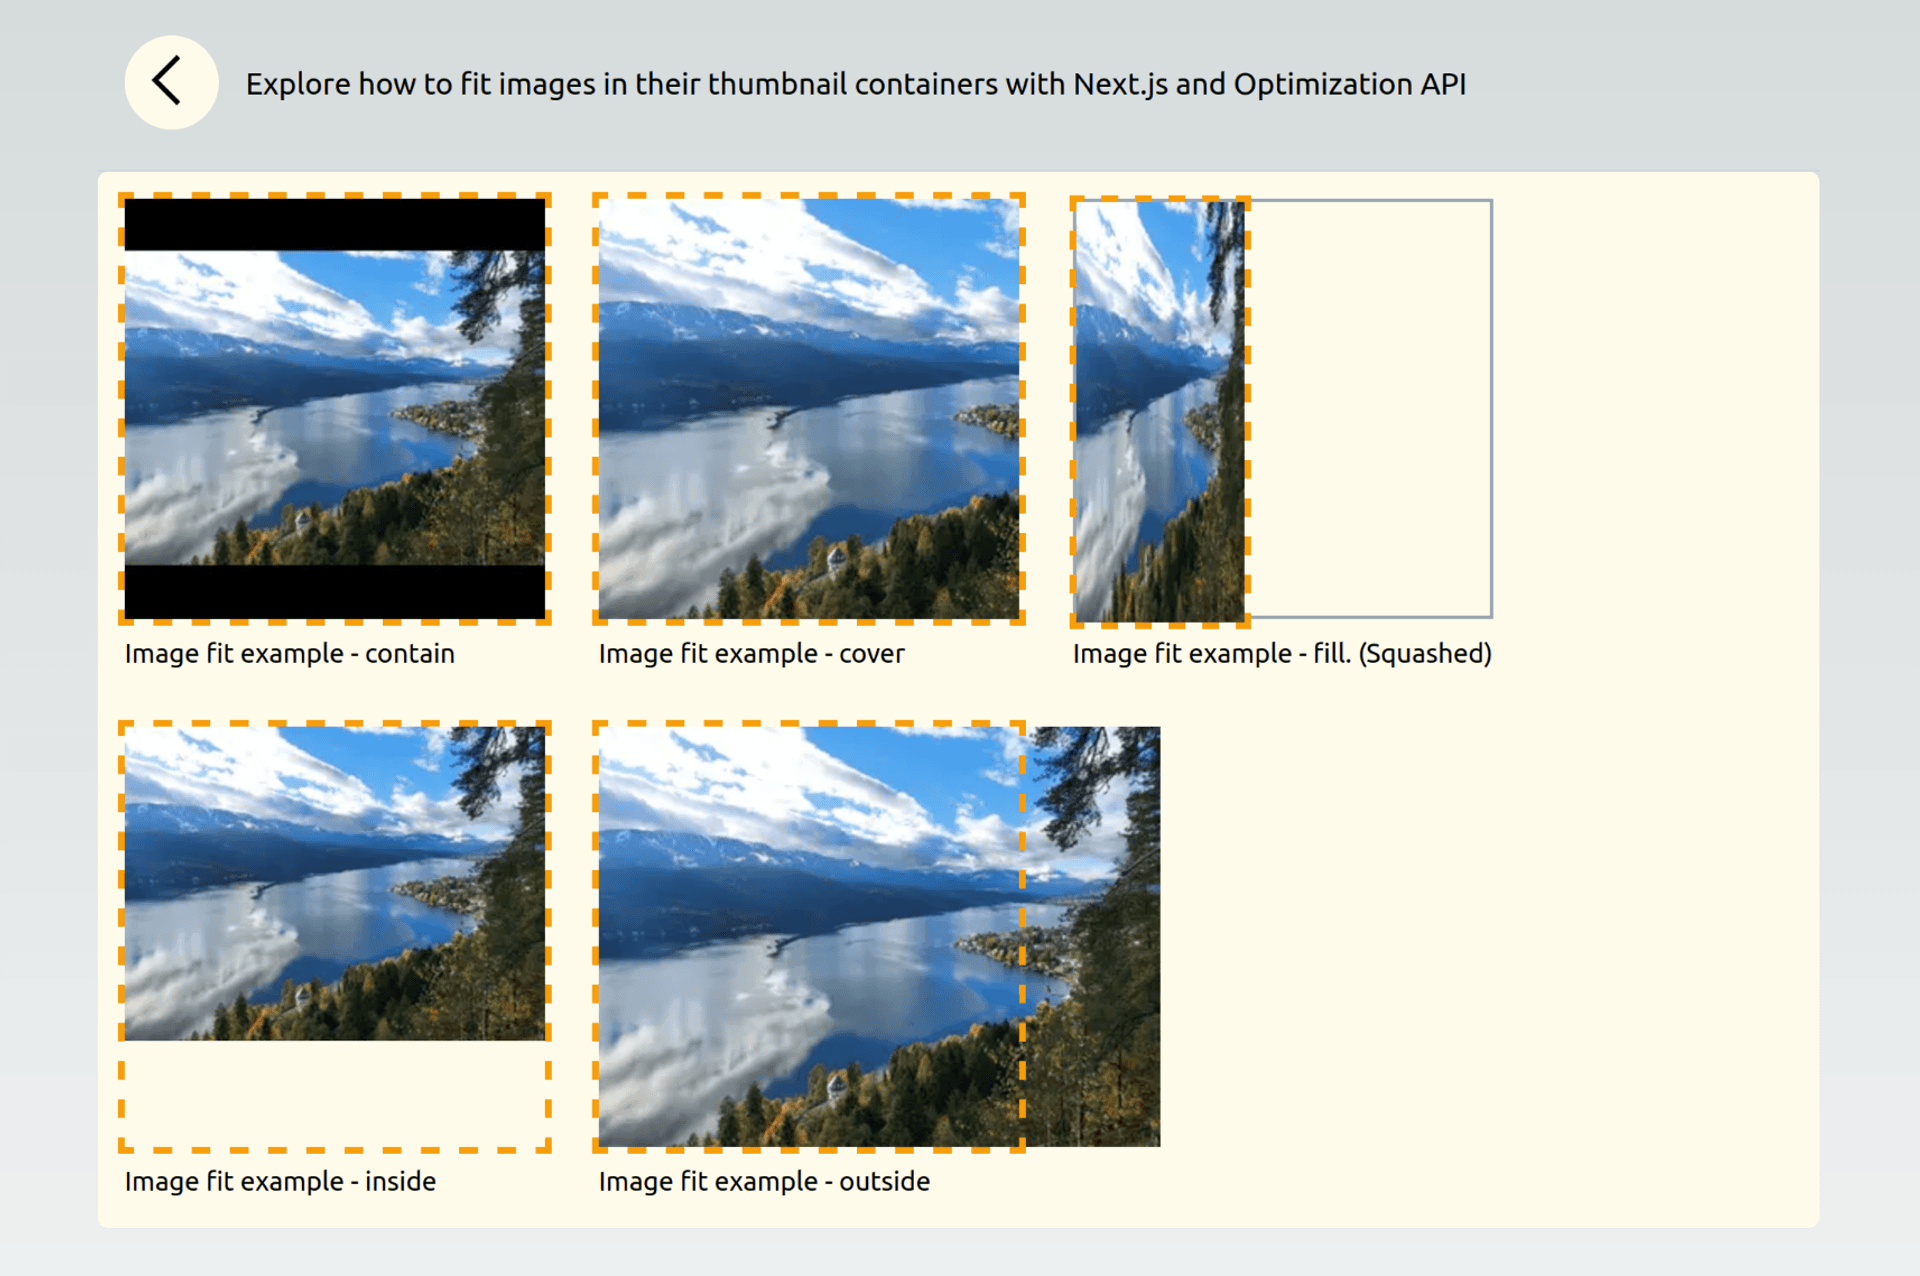
Orange dashed lines show the boundaries of the image container. The image is resized and/or cropped based on the specified fit mode. See the detailed explanation at the Sharp library documentation.
Cropped Thumbnails with loading animation
As a popular use case of images, we have cropped thumbnails with a loading blur animation.
DEMO: Cropped Thumbnails with loading animation (scroll down)
Check the video below to see how the cropped thumbnails load with a blur animation:
Full Thumbnails with loading animation
Another variation of thumbnails is full thumbnails with a loading blur animation.
Check the video below to see how the full thumbnails load with a blur animation:
What could be improved?
Image dimensions retrieval
One of the limitations of the Serverless Image Handler service is the lack of image metadata information retrieval. This means that you cannot get the original image dimensions (width and height) from the image. This information is useful for dynamically adjusting the layout based on the image size. For example, you may want to set the aspect ratio of an image container based on the image dimensions. To address this limitation, I used a separate call to Image Handler to fetch a low quality image and get its dimensions. It provides acceptable results and happens only once - on build time, when pages are pre-rendered. This is not an optimal solution, as it requires an additional call to the same API, which is not designed for it. A better solution would be to have a separate API endpoint to retrieve image metadata information. Result could be cached via the existing proxy CloudFront distribution with a big TTL, so the repeated call would be much faster and cheaper.
Serving original assets of any type
Sometimes there is a need to serve original assets, which are not always supported. For example, original SVG, GIF or video. The Serverless Image Handler is not designed to serve such assets. In this case, you need to implement an extra origin in the existing proxy CloudFront distribution that serves files from the same assets S3 Bucket as images, but directly.
Conclusions
In this article, I've explained why I chose to use a remote image optimization service for a Next.js static website and how I used the Serverless Image Handler from AWS Solutions for this purpose.
Also, I've implemented a demo app to showcase different image loading techniques, including responsive images and cropped thumbnails with loading animations.
The AWS service provides a range of image optimization and modification techniques, including resizing, cropping, and automatic serving of WEBP, PNG, and JPEG formats. The service is based on the Sharp library and can be deployed to a personal AWS account using a CloudFormation template.
The service is proven to be a good solution for Next.js static websites, offering some flexibility, faster build times, lower storage requirements, and potentially better image optimization based on user conditions.
Ask me a question
Feel free to reach out for consultation or create an issue in the demo app GitHub repository
Table of Contents
Navigate through the article